

Please read my **TERMS OF USE** before doing this tutorial.
Thanks! Auntie Em
I made some vine wreaths as a graphic gift for friends back in May of 2000
and had no idea back then of how to begin
writing a tutorial for others to make their own.
Since I have done two other tutorials now, I found out just how much fun it is
and what great satisfaction you can have out of seeing the results of a tutorial.
Soooo....here goes again!
This tutorial assumes you have a basic knowledge
of the workings of Paint Shop Pro.
Made with PSP version 6.0.
 To begin the vines, which you can save as tubes as you go along, first bring up a new image,
transparent background, size 500 X 500 pixels...it's nice to have plenty of room to work.
Add a layer. Layers > New Raster Layer > accept the default settings.
Using the Preset Shapes Tool:
Foreground Color: Black
Type: Circle
Style: Stroked
Line Width: 1
Antialias: Checked
Create as Vector: Unchecked
draw a circle in the center of the image form...roughly 200 to 250 pixels in size.
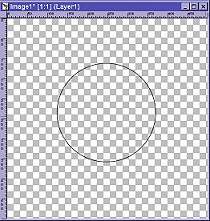
That will become a layer we will delete at a later time.
It is just there to help get a starting point.
You can use any shape you want for this first step, depending on the shape
you want for your wreath....heart shape, ellipse, square...you name it!
Add a layer...don't forget this step...we want that circle on a separate layer we delete later!
Next, draw a nice *squiggly* vine shape over your original shape.
Use the Draw Tool, settings:
Type...Freehand Line
Style...Stroked
Width....6
Antialias...checked.
The foreground color is up to you. I used a nice warm brown: #916F6F.
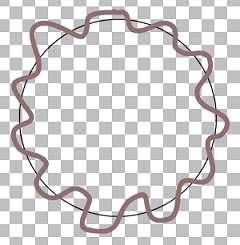
Keep in mind that it's nice to have varied colors for the vines. Sometimes I changed this color,
sometimes I changed the color I used in Inner Bevel to achieve the effect.
Now, go to: Image > Effects > Inner Bevel using the following settings.

At this point you can turn off the bottom layer, copy and paste the vine as a new image and tube it.
File > Export > Picture Tube
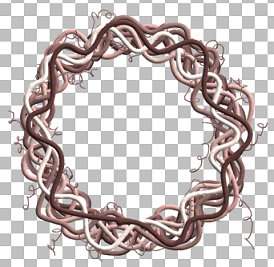
You can do this with each vine as you make them. Here's what the vine should look like now.
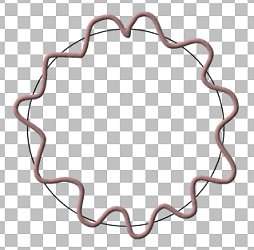
Add another layer (*LOL* Don't forget!) and draw another vine over the one you just finished.
Make the *squiggle* a bit different and remember you can use a different color for this one,
or change the color you use on the inner bevel.
Keep making vines, each on a different layer...and tubing them...kinda fun, eh?...until you have enough.
What's enough? Hmmm....I made nine vines for my first one, but only used about seven in this one.
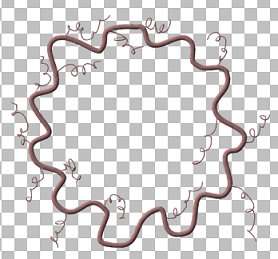
On one of your vines, you can get "carried away" and with the draw tool,
same settings you are using and Width...1
Draw a bunch of little tendrils...you can do them and undo them till you get what you like!
Just add the Inner Bevel after you get the tendrils and the vine the way you want them.
Each of the vines is now on its own layer and you can delete the first layer...the one with the circle.
This part is where you get to choose just how you want your wreath decorated!
Choose some nice floral tubes to add to your wreath. I used some sunflowers that I had tubed.
Add a layer and stamp the tube on it. Now, drag the layer down under most of the vines.
Keep adding layers and flowers until you have what you like, dragging the layers under the vines.
You don't have to drag each flower layer under all the vines, just whatever suits you.
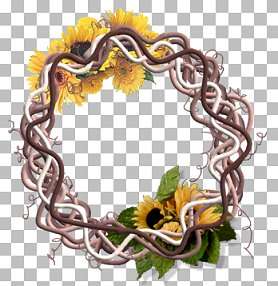
In order to make it look like the flowers are a part of the wreath,
but partially "enclosed" in it, erase some of the vines that are on top of the flowers.
Use the Eraser Tool....settings:
Shape...Round
Size...1, 2 or 3
Hardness, Opacity and Density...100
Step...2
Select the layer of the vine you want to erase a part of
and continue selecting layers and erasing parts of vines until you are satisfied.
I just chose the layer by using the Mover Tool, but you have to be careful and not move your vine!

To soften the hard edge where you erased, you can use the Retouch Tool:
Shape....Round
Size....2
Hardness...25
Opacity....32
Step...1
Density....51
Retouch Mode...(the second tab)...Soften
Just carefully, one click at a time, touch the cut edge of the vine.
Here's mine, after I erased some vines from above the flowers:
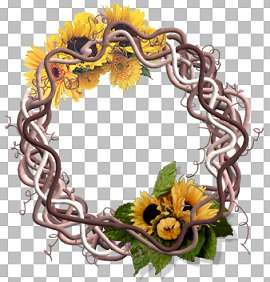
I added a bow and baby's breath and tucked them under the vines too
and added some drop shadows as I thought necessary.
Next, erase some pieces of vine where they cross each other, so the vines appear to be entwined,
using the Retouch Tool to soften those harsh edges on the erasures.
You can Merge Visible all the layers when you're ready and save the
whole image as a tube or add a background as a layer behind it.
Use this as a guide for making your very own, unique wreath!
Here are some wreaths I made as gifts for friends.
They might give you some ideas for one of your own creations.


Most of all...HAVE FUN WITH PSP!
 I am proud to announce that this tutorial
was the second place winner in the January, 2001
Tutorial Contest at Pinoy 7.
Please visit Richie Dumlao and the kind and generous donors of the prizes!

Jasc | Alien Skin | Muska & Lipman | thepluginsite
Home
tutorial and graphics © Auntie Em 2001-2007