Thanks! Auntie Em
Aaaaaah Vectors! What? What is all that moaning and groaning I hear? *LOL* Believe me, vectors iz your friend! A vector shape can be anything you want it to be....and truthfully, the best way to learn how to use those shapes is to NEED a particular shape for something you want to create with PSP.
Once you master the art of turning those little handles, you will find yourself using them all the time. They make wonderful, non-jaggy selections....just surround the shape with a selection tool rectangle, click in the middle of it and go to Selections > Save to Disc. Name your selection and that nice shape you created will be there for you to use for many other things.....just open a blank image form and "Load from Disc" your selection.
This tutorial could have been done by using selections for you to download, but you wouldn't have learned anything about vectors if I did that. I'd rather my tutorials be tools for learning how to create your own designs and shapes and making the graphic be truly your "own" work. Mind you, I have nothing against making tutorials with selections of others...it's fun to have a quick result that you can also decorate as your very own. The image in this one is just a fairly simple bunny shape, but it is "built" using vectors and there's not a huge amount of shaping you will need to do to each of the pieces. I still recommend Ron Lacy's site for more information on the use of vectors if you are having trouble with them. I'll try to do my best to show you what I did as we go along. That being said......on with the bunny!
This tutorial assumes you have a basic, working knowledge of Paint Shop Pro.
Made with PSP version 6.0

To get ready to build the bunny with vector shapes, first open a new image file, transparent background, 500 x 500 pixels in size. Now, set your foreground and background colors to contrasting colors. I used brown (#99856D) in the foreground and a light creamy color (#EEEDE0) for the background. To make the first shape, go to the Preset Shapes Tool and set it for:
Shape type: Ellipse
Style: Stroked and Filled
Line Width: 1
Antialias: checked
Create as Vector: checked
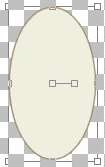
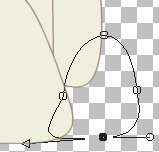
Now, for the bunny's head, make an ellipse shape close to the center and near the bottom of your image form. You may want to enlarge it some to be able to see what you are doing when you start to make it into a triangle shape with rounded corners. Go to the Vector Object Selection Tool and then click on Node Edit on the toolbox. You can leave the node (one of the four little squares you see around your ellipse) at the top alone, except you may need to pull the handles out or down a bit.
~~*whoops* Almost forgot to tell you! On these ellipses we are about to make, I didn't have to add any nodes. You can add more nodes very easily if you need them...just hold down the control key on your keyboard while you click on the vector line where you need a new node.~~
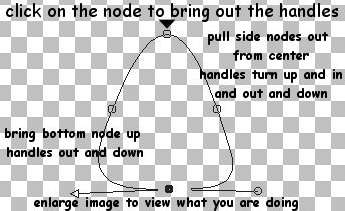
Move the nodes at the side out from where they are now and turn the top handle up and in
and turn the bottom handle out and down. Here's a screenshot of what I mean:
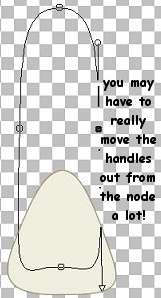
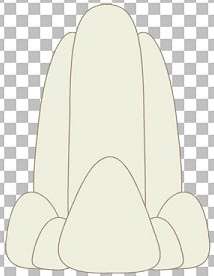
See, it's just a triangle with rounded corners! No need to "fiddle" too much with any of the control handles on these vector shapes. Always remember that handy-dandy *UNDO* function of PSP....*LOL*....use it if you mess up...I sure do! Once you are satisfied with your shape for the bunny's head, right click and "Quit Node Editing", then go to Layers > Convert to Raster. This becomes layer two...you can name it, if you choose.On the Layer Pallette, go back and activate layer one....which actually has nothing on it right now....just transparent. You will draw your next ellipse for the "body" on this layer and convert it to a new raster layer after you finish it....which will automatically place it behind the bunny's head on your image form.Create a new ellipse. Use the same settings for ALL of the ellipses...we will be making them just as we did the first one. Make this one a long kind of narrow ellipse. Begin to shape it like we did before, (go to Node Edit) but moving the side nodes closer together. You don't have to worry too much about the bottom of this ellipse...it just needs to be completely behind the head of the bunny. To check your progress on making the shapes just right click and "Quit Node Editing"...you can always go back to Node Edit again to do more shaping.
When you think you have the body shape the way you'd like it, go to Quit Node Editing > Layers > Convert to Raster.
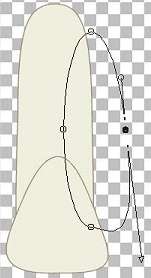
Time to make some legs and feet for this bunny. Again, make layer one the active layer...the transparent layer. This will put the leg behind the body when we make another layer with it. Draw a tall ellipse just slightly under and to the right of the body. Not much shaping on this one when you go to Node Edit. The bottom of this leg will be covered by the hind foot, so it needs to come down to just above the bottom of the head of the bunny. As you can see, I have just rearranged one or two of the nodes to make the shape I needed.
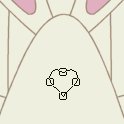
Make layer three the active layer (you want to make the feet just behind the head and above the body and legs). Node Edit and begin to shape a new ellipse into a large foot. Something like this:
Make layer five (the one with the hind foot on it) the active layer and make a small foot similar to the shape you just made....it will become the front foot. Node Edit > Quit Node Editing > Convert to Raster > Duplicate > Image > Mirror. You will have to move this layer up on the layer palette to just above the Copy of Layer Five. The two front feet should be in front of the hind feet...at least that's what Mother Nature says. *LOL*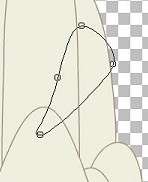 For the inner ear, change your background color to a nice pink (I used #E2AEC4) and shape that inner ellipse as shown above...just inside the ear you made first. Duplicate and put into place on the other side like we have been doing.Activate the topmost layer and you can start to make facial features.

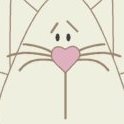
You can see here how I added the facial features, using that brown color I have in the foreground. For the mouth, on that new layer I just added, I used the Draw Tool, settings:
Type: Single Line
Style: Stroked
Width: 2
Antialias: Checked
Create as Vector: *UNchecked*
I like using a lot of layers, so I used a new layer for each set of features. Use the Draw Tool with the same settings to draw his eyebrows, teeny filled ellipses (non vector type...*LOL*) for his eyes, and a Bezier Curve Style for his whiskers...you could also use the Freehand Line for them too.
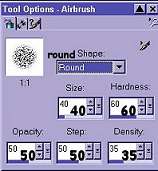
If you've successfully followed along this far, it's time to add some depth and shading to the bunny. There are many ways to do this other than the way I have done it. You could use cutouts on the various layers, adding a layer after selecting.....or inner bevel. Each part should be on a different layer and you would do each layer separately. I like this way, because it adds a nice, country-style look. Go to the Airbrush tool with the following settings:
I picked a nice light grey for the foreground color (#C0C0C0)...the one just above white on your color picker. Depending on your colors, you might want a darker or lighter color.
Pick a layer to start shading. I chose the head and didn't add too much shading, since it's closer than the rest. Make that layer the active layer. Go to the Selection Tool, settings:
Selection Type: Rectangle
Feather: 0
Antialias: Checked
Surround the body part on that layer with the rectangle and click on the part. This will give you "marching ants" all around that part. Now, to make sure that the outer edge to the form stays nice and clean and sharp, I go to: Selections > Modify > Contract *by one pixel*. That puts the marching ants just inside the line.
It gets just a little bit tricky now, so remember that *UNDO*. *LOL* Anything you "spray" outside that line of marching ants won't show up on your body part, so you can spray just barely close to the edge and a line of shading will begin to show up. Try it....see what I mean?
Be sparing with that airbrush and add it as much or as little as you feel you need. I found that when I used it long enough that sometimes one or two *swoops* near the edge was all I needed. I hope this is all the information you need to get you going on the shading. You will do this same thing to all the various pieces.....activating each layer and selecting as above.....to give them some dimension.
Keep picking parts and shading them until you have each part shaded....well...except for the nose...*g*...I didn't do anything to that. For the rosy cheeks on Bunny, make that pink color you chose your foreground color. Select the head just like you have been doing...by surrounding with the rectangle, clicking on it, and contracting by one pixel. Add a layer. With the airbrush tool....same settings....just *spritz* each cheek in. I did it three or four times per cheek.
Then go to: Image > Effects > Blur > Gaussian Blur....6
That should do it!
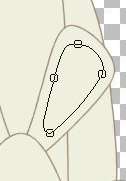
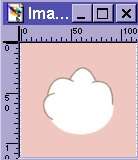
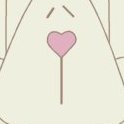
Now for the tail on this wabbit.....hmmm.....bet you have lots of good ideas for that! *ROTFL* You could even use tubes that are out there on the net that look white and fluffy! Any way you choose to make this cottontail is the right way for you! I made mine in two different ways....one was a vector shape that I made with the stroked and filled line tool in a very pale ivory color (#FEFCFC)....just shaded it like I did all the other parts. Another way is to make a non-vector ellipse with a filled shape in pale ivory and draw around the edges with the stroked and filled line tool.
I made this screenshot with a pink background so that you could see a bit better what I did. If you can use the bezier line, stroked and filled around the outside, it makes some nice curves. That's what I am using here:
Just drag that tail layer behind the bunny and into place, shade it with the airbrush like you did before and that's it!
At this point, you can tube each layer separately to use for making other bunnies....they multiply, ya know! *giggle*...or, you can merge the layers and just tube the whole thing.
File > Export > Picture Tube.
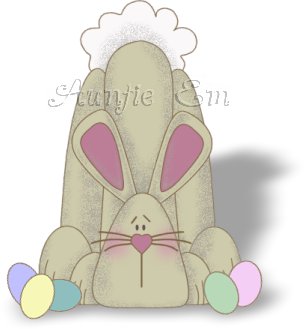
Here's one I made with a slightly different color and the big ole bunny tail I made out of a vector shape.
He needs more than a few Easter Eggs, eh? Well, whatcha waitin' for? I always like to leave the decorations to you! *LOL* Hope you had fun with him and learned lots more about those pesky vectors!
Back
tutorial and graphics © Auntie Em 2001-2007